How to Photograph Roses: A Complete Guide
How to Photograph Roses
Learning how to photograph roses can transform your flower photography, they are among the most popular subjects in flower photography, admired for their elegance, rich colors, and symbolic meaning. While they may seem easy to photograph, capturing a rose in a way that feels fresh and expressive requires attention to light, composition, and detail.
This guide walks through the key techniques to help you photograph roses beautifully.
Choose the Right Light
Light is the foundation of a strong rose photograph. Natural light is usually best, especially early in the morning or late in the afternoon when the light is soft and warm. Morning shoots are particularly rewarding because dew on the petals can add texture and sparkle.
Avoid harsh midday sunlight when possible, as it can wash out colors and create strong shadows. If shooting at that time, try placing the rose in open shade or diffusing the light with a sheer cloth or reflector. Indoors, soft window light or a single diffused lamp can produce elegant results.
Lighting Tips for Close-Ups:
When filling the frame, light becomes critical.
- Soft overcast light reveals detail without harsh shadows.
- Side lighting enhances texture and depth.
- Backlighting makes petals glow, especially lighter varieties.
- Indoors, diffuse window light is ideal.
Avoid harsh midday sun—it flattens detail and creates blown highlights.
Use the Right Lens and Settings
A macro lens is ideal for rose photography because it allows you to capture fine details like petal veins and subtle color gradients. If you don’t have a macro lens, a telephoto lens can also work well by helping isolate the rose from the background.
Use a wide aperture (such as f/2.8 to f/5.6) to create a shallow depth of field and blur the background. This keeps the focus on the rose itself.
For sharp images, especially in close-up shots, use a tripod and a low ISO to minimize camera shake and noise.
Best Camera Settings for Rose Photography
- Aperture: f/4–f/11 depending on depth needed
- ISO: Keep low (100–400) for detail
- Shutter Speed: Fast enough to avoid motion blur (especially outdoors)
- Manual Focus: Helpful in extreme close-ups
When shooting macro, depth of field becomes very shallow—be intentional about what you want sharp.
Focus on Composition
Composition transforms a simple flower into a compelling photograph. Instead of centering the rose every time, experiment with the rule of thirds or off-center framing. Shooting from different angles—above, below, or from the side—can reveal new perspectives and highlight the rose’s structure.
Pay attention to the background. A clean, uncluttered background helps the rose stand out, while complementary colors enhance its visual impact. Remove distractions like dead leaves or stray branches from the frame when possible.
Another approach that many photographers use is the Fibonacci spiral or Golden Spiral. It is built from squares sized according to the Fibonacci sequence. When you draw a curve through them, you get a spiral that expands outward.
In photography, this spiral is used as a composition overlay to place your subject strategically. For a more in more depth overview of the Golden spiral, click here.
Capture Details and Textures
Roses are rich in texture, making them perfect for close-up photography. Focus on individual petals, the spiral center, or even the thorns and leaves. These details can tell a more intimate story than a full bloom shot.
Water droplets, whether natural or lightly sprayed, can add interest and a fresh, delicate feel. Just be careful not to overdo it—subtlety works best.
Control the Environment
If you’re photographing roses outdoors, wind can be a challenge. Use a fast shutter speed or gently stabilize the stem with a clamp or your hand (out of frame). In a studio or indoor setting, you have full control over background, lighting, and positioning, allowing for more creative experimentation.
How to Fill the Frame Effectively
1. Move Closer (Physically First)
Before zooming, step closer. This preserves image quality and improves perspective.
2. Use a Macro or Telephoto Lens
A macro lens (e.g., 90mm–105mm) lets you capture petal texture and dew drops in crisp detail.
A short telephoto (70–200mm) helps isolate the bloom with beautiful background compression.
3. Focus on the Center Spiral
The center of a rose is naturally magnetic. When filling the frame, try:
- Centered compositions for symmetry
- Slight off-center framing for dynamic tension
4. Watch the Edges
Since the flower fills the image, check:
- No awkward petal cut-offs
- No bright distractions peeking in
- Clean corners
The Top-Down Viewpoint
The top-down (overhead) viewpoint reveals the rose’s geometry in its purest form.
Instead of viewing the flower from the side, position your camera directly above it and shoot straight down.
Why shoot from above?
1. Reveals Natural Symmetry
Roses grow in layered spirals. A top-down shot emphasizes:
- Radial balance
- Petal repetition
- Hypnotic patterns
2. Creates Graphic, Modern Images
Top-down rose photos often feel:
- Clean
- Minimalist
- Almost abstract
They’re perfect for fine art prints, social media, and editorial work.
3. Removes Background Clutter
When shooting from above:
- The stem and leaves are minimized
- Background becomes less distracting
- Focus stays entirely on the bloom
How to Perfect the Top-Down Shot
1. Get Directly Over the Flower
Avoid slight angles. Even a small tilt changes the symmetry.
Tip: Use live view with grid lines enabled to align perfectly.
2. Stabilize Your Camera
Because you’re shooting downward:
Use a tripod with a center column that tilts horizontally
Or brace your elbows for stability
3. Mind the Background
If the rose is in a garden:
- Look for clean soil, grass, or foliage underneath
- Avoid stray leaves crossing the bloom
In a studio:
- Place the rose on a neutral surface (white, black, textured wood)
Combining Both Techniques
The magic happens when you fill the frame from a top-down perspective.
This approach:
- Eliminates distractions
- Showcases geometric beauty
- Turns the rose into an abstract design
The image becomes less about “a flower in a garden” and more about shape, texture, and color harmony.
Composition Enhancements
Add Water Droplets
Mist the rose lightly for:
- Sparkle
- Texture contrast
- Emotional depth
Shoot Different Rose Types
Experiment with:
- Tight, compact blooms
- Fully opened roses
- Varieties with contrasting inner and outer petal colors
Each produces a different visual rhythm.
Play with Color Contrast
Pair:
- Red roses against dark backgrounds
- White roses against soft pastels
- Yellow roses against green foliage
When filling the frame, color becomes your primary storytelling element.
Edit with Restraint
Post-processing should enhance the natural beauty of the rose, not overpower it.
Adjust exposure, contrast, and white balance to maintain accurate colors.
Light sharpening can bring out petal detail, while gentle vignetting can draw attention to the subject.
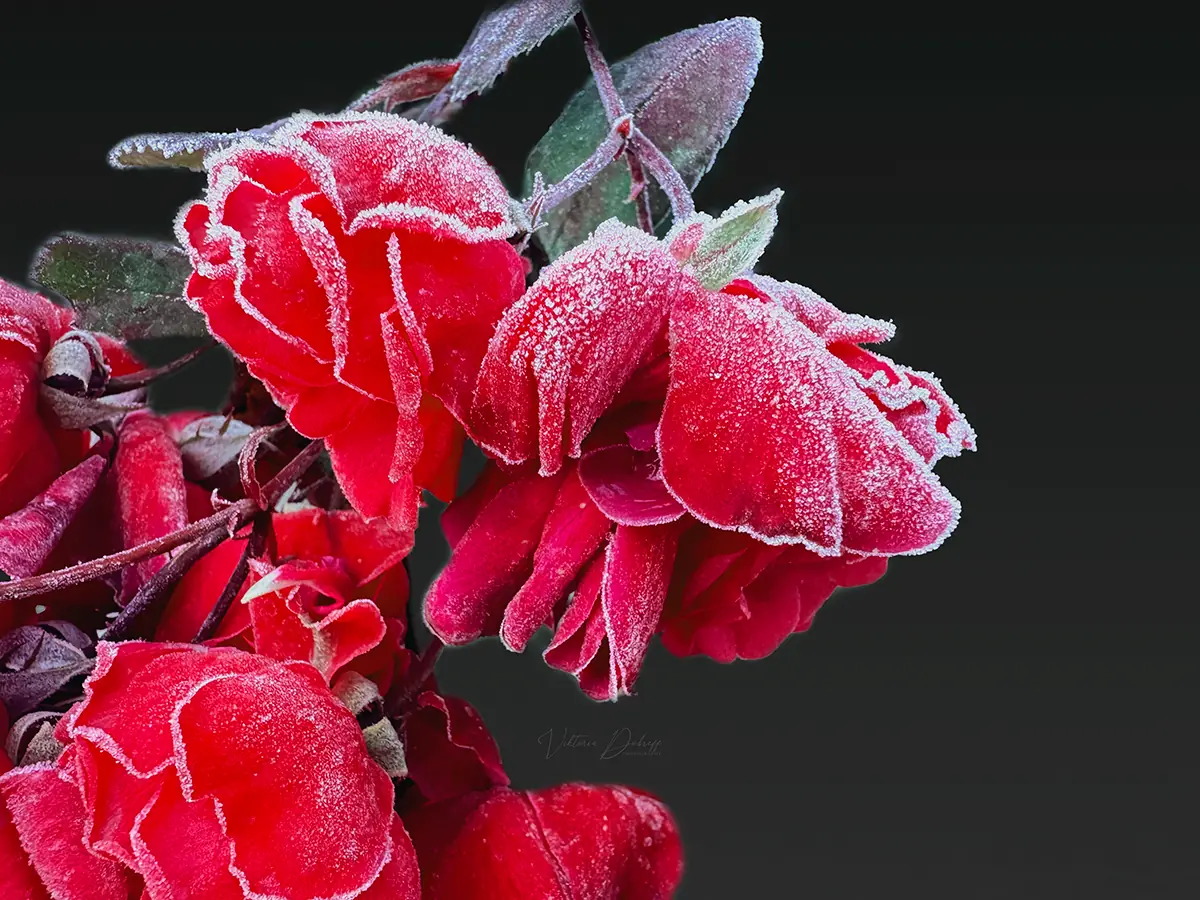
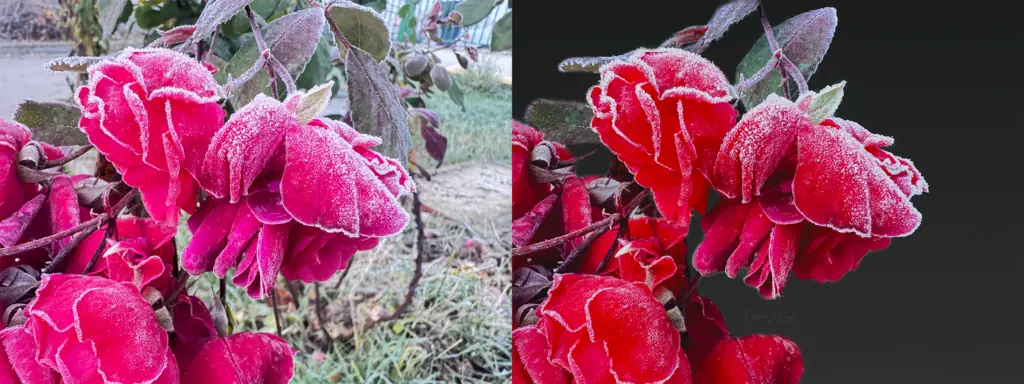
Here is an example of an edit which I made in order to bring out the frost details and the roses itself. I used the gradient tool in order to make a smooth transition to a single-color background, creating contrast that draws attention to the flower as the focal point.
Practice Patience and Observation
Great rose photography comes from slowing down. Observe how light moves across the petals, how colors shift at different times of day, and how each rose has its own character. The more time you spend with your subject, the more expressive your images will become.
Conclusion
Photographing roses is a blend of technical skill and artistic sensitivity. By mastering light, composition, and detail—and by approaching each rose with patience and curiosity—you can create images that go beyond documentation and capture the timeless beauty of this iconic flower.
Rose photography rewards patience and attention to detail. By mastering:
- Filling the frame to eliminate distractions
- Top-down viewpoints to emphasize natural symmetry
You transform a common flower into a striking visual study of form and texture.
Next time you see a rose, don’t just photograph it. Step closer. Move above it. Let it completely take over the frame.
That’s where the magic happens.
Frequently Asked Questions
What is the best lens for rose photography?
A macro lens (90mm–105mm) is ideal for rose photography because it captures fine details like petal texture and water droplets. If you don’t have a macro lens, a telephoto lens (70–200mm) can also work well to isolate the flower and create a soft background blur.
What camera settings should I use for photographing roses?
For sharp and detailed rose photos:
- Aperture: f/4 to f/11 (depending on depth of field)
- ISO: 100–400 for minimal noise
- Shutter Speed: Fast enough to avoid motion blur (especially outdoors)
When is the best time to photograph roses?
The best time is early morning or late afternoon when the light is soft and warm. Morning is especially ideal because dew droplets can add texture and visual interest to your photos. Avoid harsh midday sunlight, as it can create strong shadows and washed-out colors.
How do I get a blurry background in rose photography?
To achieve a soft, blurry background (bokeh):
- Use a wide aperture (f/2.8 – f/5.6)
- Increase distance between the rose and the background
- Use a longer focal length lens
How do you take close-up pictures of roses?
To capture detailed close-ups:
- Use a macro lens or macro mode
- Focus on the center spiral or petal edges
- Keep your camera stable (use a tripod if needed)
- Shoot in soft, diffused light for better texture
Why shoot roses from a top-down perspective?
A top-down view highlights the rose’s natural symmetry and spiral pattern. It creates clean, minimalist images and removes distracting background elements, making the composition more visually striking.
How can I improve composition in flower photography?
Improve your composition by:
- Using the rule of thirds
- Experimenting with angles (top-down, side view)
- Keeping backgrounds clean and uncluttered
- Filling the frame to eliminate distractions
Can I photograph roses indoors?
Yes, roses can be photographed indoors using:
- Soft window light
- A diffused artificial light source
- A clean or textured background